Sunday, August 22, 2010

Baby Quilt Part II


It's finished! This weekend has been full of creative happenings in our house, mostly involving ripping of lath and plaster from the walls in Thomas's room, and then gibbing it, but somewhere in between all the dust and mess and mayhem I managed to finish Flossy's quilt (Flossy being the name we've given to this bubs while in utero). Ever since I've been walking around like someone who won the lottery and keeps checking their ticket just to be sure - I keep taking a quick look at the quilt to make sure it's as lovely as I remember. And it is. Ok, so my quilting lines aren't perfectly straight and my stitch lengths are a bit all over the place (teething problems with my new walking foot I think), but I don't care. It is handmade afterall, and by definition that means it has to have a few little imperfections.


When it came to quilting, I was always going to do the diagonal lines across the squares like I've done, but I was hoping to do something a little bit more elaborate round the edges. I had even gone to the trouble to search the internet for simple floral quilting designs and thought I'd found something that would work. That was, of course, until I realised that quilting is tricky, especially when you have that much bulk trying to get through the machine. So, in the end I decided not to risk mucking it up and haven't done any quilting around the edge at all. Simplicity has won out in this case, and I actually think the quilt is the better for it. But did you know that you can send your quilt top away to get professionally quilted, and that you can buy special quilting machines with long arms? I learnt that and all sorts of other stuff while trawling the internet for quilting designs. Brilliant!


And, of course You Tube was invaluable when it came to sewing on my binding. I had downloaded printed instructions from Heather Bailey's blog but after having read through them a few times I was still confused so decided to see what videos I could find instead. And voila, I found this one and it was perfect (although I did opt for 2.5" wide strips as per Healther's directions, rather than the 2" ones suggested in the video). Taught me everything I needed to know in less than 10 minutes. If only the hand stitching had been as quick!

Thursday, August 19, 2010

Baby Quilt Part I


As promised, here is the first installment on the baby quilt I'm making for the much anticipated Martin Baby #2. As you can probably tell from the colours we've been told that the baby is going to be a girl, so I hope they're right! 


This is the top all pieced together and I'm really pleased with the result. I wanted to go for fresh, clean colours that weren't too baby-ish, and in terms of design the main principle was that it had to be simple since I'd never patchworked before, and not too contrived looking either. I got the design idea from etsy where there are literally hundreds of quilts for sale, and I just made it to fit the dimensions I wanted. Each of the large squares is 5 inches x 5 inches and the small yellow squares are 1 inch x 1 inch. The border is 4.5 inches wide I think. Anyway, all up the quilt is about 1m x 1.5m, so it'll be plenty big enough for a cot, and will still look good on a single bed.

I realised that cutting accurately was the key, so after watching several videos on You Tube on how to patchwork I went out and bought myself a patchwork ruler. What a brilliant invention! Bascially it's just a clear ruler with lots of different markings on it (I went for an imperial rather than metric one), but it allows you to cut lovely straight, square or angled lines. I already had the pizza-type cutter and the cutting board so I was all set then. Apart from the fabrics ...


I had the loveliest time going through my stash and picking out all those favourite fabrics that I've been collecting but waiting to use on that special project, and then I visited just about every patchwork shop in Christchurch looking for the right fabrics to coordinate with them. What fun! I was very restrained, but still managed to end up with lots of left-overs. I think this new baby will be wearing dresses that coordinate with her quilt for years until I've managed to use them all up! Anyway, for the backing fabric I decided on a Heather Bailey fabric called Church Flowers. The colours are beautiful and work perfectly with the top, plus because it's not plain hopefully it will mean any little imperfections when I come to the quilting will be hidden. For the binding I've decided on a stripe, also by Heather Bailey called Slim Dandy. Both fabrics are from her Nicey Jane collection.

I had thought all my decisions about this quilt were made, but that was until I went shopping for the inner. Who knew there were so many different options?! ... polyester (not recommended for babies under 12 months), cotton, cotton/bamboo, wool, the list goes on. I ended up going for cotton, simply because it's machine washable and I'm all for that! I'm going to use 2 layers though as I want a bit of weight in the quilt and since the batting it so wide I don't have to buy extra to allow for this. Now I just need to pin it all together (using the rather expensive but apparently invaluable quilters safety pins), quilt it, and sew on the binding. Time to do some more how-to videos watching on You Tube. Until next time ... 

Thursday, August 12, 2010

Time for a SALE!

Hello everyone. Well, I haven't lived up to my promise of posting blogs more regularly than I have been lately, but nevermind. Here's a post that will hopefully make everyone's day ... Fabrication is have a super sale, with 10% - 35% off everything. That makes for some very nice pricing, especially when you realise those discounts are off already low everyday prices. So, get shopping because stock is very limited and once it's gone it's gone....

.... And, I want EVERYTHING gone because I've decided that I'm going to take a break from Fabrication for a while.Come the 27th of August my shop will be closing. At this stage I'm not sure whether it will be a temporary or permanent thing - I'm just playing that by ear. But, I would like to very genuinely thank everyone who has supported Fabrication, whether it be by reading this blog, buying from the online store, or buying at one of the market's we've been at. Your support has been very much appreciated and has made for some very happy times.

Unfortunately for me at the moment time is something which I don't have too much of, and with another baby on the way (due Dec 19) I suspect life is going to get even more hectic! I do hope to kept blogging though as I can't imagine I'll suddenly stop making things just because I'm not selling the fabrics anymore. In fact, my current project is a quilt for the new baby ... stay tuned for a post on that.

Saturday, July 24, 2010

Another Baby Dress


Hello everyone. It's been absolutely ages since I last posted anything worthwhile here, so apologies. I have been feeling as if I have lost my sewing/creative mojo as it were over these past months. I'm not sure whether it's the dreadful weather (although you would think that need to be inside all the time would inspire rather than impede creativity), my inability to focus on one thing at the moment, or just a lack of motivation, but whatever it is/was it has left me feeling a little bereft. Luckily, new things are on the horizon, including a new baby daughter due any day to a very good friend of mine, and this seems to have been just the thing I needed to get back behind my sewing machine with some degree of enthusiam. 

I have had these prints in my stash for ages, but love them so much that I have been saving them for a very special project (and one that didn't take too much fabric, as my supply was very limited!), but finally I had just the use for them - a baby dress. The pattern is a bit of a mish-mash ... I used the do up at the front idea from this dress I made previously, and the rest I took from a pattern book on making a baby layette my aunty gave me. I think it dates back from the early 1970s which meant some of the sewing terminology was foreign to me, so I decided to ditch the instructions and just go for it myself. Dresses like this are pretty simple, so it wasn't hard to muddle my way through. I absolutely adore the result ... now little miss bubs just needs to come out with a complexion that suits red and we'll be sitting pretty.

Sunday, June 6, 2010

Feeling blue? How about grey?


All this horrible rainy weather is the perfect excuse to stay indoors, dust off the sewing machine, and get creative. And, I have just the fabrics for you ... two new lovely designs from the Leanika collection by Dena Designs, both in bluey-grey hues which match this wintery weather perfectly. The fabric on the left is Jardin and the one on the right is Paisley and both of them are available from the Fabrication store. Happy shopping!

Saturday, May 22, 2010

More new fabrics - from Art Gallery Quilts this time ...


Four new fabrics from Art Gallery Quilts arrived this week. All four coordinate beautifully together and are from the Sugar collection. I've just loaded in my shop so if you love them get in quick because quantities are limited!

Friday, May 14, 2010

Fridge magnets


I'm a bit of a hoarder. Not of everything mind you ... my house isn't full of piles of newspapers and miscellaneous stacks of crap, but I'm definitely a hoarder when it comes to fabric. I'll make something and keep every last little scrap of off-cut, thinking that maybe one day it'll come in handy. Well, for some of my scraps, that day arrived last weekend when my niece and I decided to get crafty by making some fridge magnets.

Veeky's at that great age (nearly 8) where she's into making stuff, has a good grip on how to use a pair of scissors, and can concentrate for long enough to get through a task. So, we made the most of it and made A LOT of magnets. These are really easy, you just need some fabric scraps, felt, magnets (we used self-adhesive magnetic strip that you can just cut up), a pair of pinking shears and your regular old sewing scissors. Oh, and a sewing machine of course.

I got the idea for making magnets from my friend Jo who gave Thomas some for Christmas. They were a big hit with him, so Veeky and I made him some more, plus lots for Veeky's sisters, Mum, Dad, aunty and grandparents. So why don't you give making some a go? They make a fabulous present and are a great way to get a little person you know involved in something crafty (because you can never start to young!). Plus, you can try out all those crazy stitches on your machine that you've never had a chance to use before.


p.s. sorry for the lack of posts lately ... things have been a bit hectic around here and my sewing time seems to be the first thing that goes out the window!

Saturday, May 1, 2010

It's twins! Time for bibs!


My close friend very recently had twin boys and all her pain and agony at carrying them for 9 months was fully understood when they emerged at 7lb 5oz and 8lb 1oz (sorry, when it comes to babies it's pounds and ounces for me, none of this kg palava!). I know, talk about whoppers! Absolutely gorgeous whoppers though - I visited them in hospital and almost had to wipe up the drool. There's nothing quite like a new born baby ...

... Anyway, my friend's first child was rather spewy when she was tiny due to terrible reflux. Not wanting to tempt fate, but aware of the role that genes have in this sort of thing, I thought a good present for the new baby boys would be bibs, and lots of them. So, I got to making some from the David Walker fabrics in my shop. All the fabrics were from his Oh Boy! collection and the small prints worked really well.

One fat quarter made 2 bibs, so this was a great use of fabric. I then used towelling for the back and edged them in bias binding (more dramas using the awful stuff, so don't look too closely at the pics!). Then I just used domes to hold them together. Despite knowing for many months that the twins were arriving I of course left my run right to the last minute, but luckily these were quick to make and I managed to make all 6 bibs in a couple of hours. Why don't you give something like this a go?

Thursday, April 22, 2010

Lilly-Dee Designs


One of my favourite things about receiving a fabric order from my shop is imagining what the fabrics are going to be used for. This is especially so when I get an order for a fat quarter bundle (a random selection of four fat quarters). Sometimes my customers write me a wee note to let me know what their favourite colour is, or more often what their least favourite colour is, but usually I have no idea so I just go about imagining what my customer might like and send them off what takes my fancy that day. I'm pretty sure I don't always get it right, but that's the fun of ordering in this lucky dip fashion. So, what do you do with your fabric? Do you turn it into clothes, cushions, bags or simply store it up for a project that will come along one day? I'd love to know.

One customer of mine who has let me know what she does with her fabric is Helen from Lilly-Dee Designs. She has a small business making gorgeous soft toys for kids, based right here in NZ, and she sent me some pictures of a couple of the toys she made using fabrics a recent order. I think you'll agree that these guys are very cute and a great gift idea. So, if you're in the market for something handmade and just perfect for a little person in your life, check out Helen's website:  http://www.lilly-deedesigns.yolasite.com/. Her prices are extremely reasonable and she makes to order. What more could you want?!

Friday, April 16, 2010

Don't forget ... Stash reHash is this Sunday!

Hi everyone, just a quick reminder that Stash reHash is on this Sunday, 18 April from 11am - 2pm. Come prepared with an empty shopping bag, lots of cash (no eftpos facilities on site sorry), an eye for a bargain and your elbows ready to give other fabricaholics a gentle nudge out of the way if they get a bit bolshy.

I'll be there with all my new fabrics, plus some treasures from Nana's stash ... get in early so you don't miss out!

Here's what else you need to know:

Sunday 18th April 2010
11am - 2pm
at the Scottish Society Hall
corner of Edgeware and Caledonian Roads
St Albans, Christchurch.

There'll be dozens of stall-holders including Arthritis NZ selling a huge variety of fabric (new, old, designer, vintage, retro and for dressmaking, crafts, interiors and upholstery), buttons, yarn, haberdashery, patterns, vintage textiles, embroidery and other craft supplies.

Wednesday, April 7, 2010

Oven Mitt


I made this oven mitt for my Nana. It was supposed to be a Christmas gift but it's somewhat late - hopefully she'll be forgiving over my relaxed schedule when it comes to making promised items for family! Anyway, her criteria was that the wanted a single mitt design rather than oven gloves, and she wanted it in navy. Unfortunately I didn't have any navy fabric (plus navy is rather boring don't you think?) so I've made this one in Narrow Stripe in Blue for the top and Circle Pane in Blue for the Bottom. I did use navy for the trim though, so hopefully she'll forgive me for digressing from her wishes.

I used a Cath Kidston pattern which I found on the internet here. To be honest, it's a bit hard to follow and it didn't have a scale, but I muddled through. I made my oven glove 70cm long, with the hand pockets 20cm long each and I made the whole thing 20cm wide. Using those measurements, I got away with 0.25m of each of the exterior fabrics (note - cut as a strip rather than as a fat quarter). I also used 0.25m of wool batting, 0.25m of some special heat reflective stuff (not sure exactly what it's called, but just ask at your local fabric store - I don't stock it sorry!), and about 2m of 25mm wide bias binding. The Cath Kidston pattern doesn't call for the heat reflective stuff, but I'd definitely recommend it because there's nothing worse than burning yourself on hot dishes. If you wanted to do that you wouldn't bother to wear an oven mitt now would you?!

Now, it all seemed straight forward enough, but never having worked with bias binding before (should I be admitting that?) I did find this somewhat challenging. Firstly I bought the wrong sized bias binding and had to go back and get some more as the smaller stuff just wouldn't fit over all the layers. Then, because of all the layers my machine had a bit of a hissy fit and kept choking on the bobbin. And then, to top it all off, I struggled with the very act of sewing the bias binding on using a nice straight topstitch, so it's a bit all over the place. Oh well, despite the end product being less perfect than I usually accept, it's turned out ok and will be functional enough. And, since Nana is nearly blind I don't think she'll be inspecting it for its imperfections! Thank goodness!

Monday, March 29, 2010

New fabrics just in time for Easter


Three new fabrics just in and all from the divine Riley Blake, this time from the Summer Song collection. Taking it from the top we have Summer Flowers, Trees, and Summer Stripe, all in the pink colourway. Perfect timing for anyone wanting to get creative over the Easter break. Hooray for long weekends!

Oh, and speaking of long weekends, the Fabrication shop will be closed over Easter. You can still purchase online, but orders won't be posted until Tuesday.

Sunday, March 28, 2010

A dilemma resolved


So, I know it's sometimes hard to tell what goes with what, especially when it comes to fabrics and you're thinking about buying them online (like from my shop). Problem is, it's sometimes tricky even when you've got all the fabrics staring you in the face. More often than not though, when this happens it isn't deciding which fabrics compliment each other that's the hard bit, it's deciding which one works best when you've got more than one to choose from. 


Take, for example, this divine fabric above called Autumn Floral (so named by me because it only came with a horrible number for a name, and that's not very helpful is it?!) from the Wa Nouveau collection. I loved it the minute I set eyes on it and instantly wanted to turn it into a bag. Problem is, the kind of bag that I wanted to turn it into required at least a second complimentary fabric to go with it to make the band and handles, and ideally also a third for the lining. Here beginneth my dilemma - when I started looking, I actually had too many choices. I had decided early on that I wanted to make the handle and band out of dark denim that I already had on hand, both for strength and because it looks lovely with this fabric, so that was fairly simple. But, when I started looking through my fabrics for a lining fabric I had not one, not two, not even three, but four very reasonable and lovely options.


As you can see from the pictures, each fabric combination certainly has its merits. For example (in order of the photos), I love the way the Floral Drop in Azure not only ties in the colours, but how the small flowers mirror the shape of the larger flowers in the Autumn Floral fabric. But, I also love the way the Green Stripe (also from the Wa Nouveau collection) livens up the colours in the Autumn Floral, and the way the Botanica Dots fabric is soft and subtle in its tonings. In the end, however, I went with the Simple Stripe in Frost. This surprised me a bit actually - it certainly wasn't the first fabric I picked up and thought of as an option, but it works because it draws out the lighter blues in the Autumn Floral (despite looking a bit insipid in the pic above). The main reason I chose it though - it is light coloured, so when you open the bag and are searching for your keys you don't need to shine a torch in there to find them. Remember that ladies - bags with light coloured linings make for less time rummaging around in the bottom of your purse!

Sunday, March 14, 2010

On dressing gowns ...


Anyone who knows me well knows that I love my dressing gown. I think I inherited this love from my mother, who has always worn one (well, for as long as I can remember anyway). I certainly know that it didn't come from my dad. He finds them loathesome and wouldn't be caught dead in one ... although I do remember one Christmas back in the early '80s when my grandma made my dad and two younger brothers matching "man-robes". Basically they were just bits of orange towelling that covered the bottom and not a lot else - a bit like tool-belts actually. I distinctly remember a photo of the three males in our family all lined up in front of the Christmas tree in their matching orange attire. I think that may have been the one and only time the "man-robes" were worn. Probably a good thing too as they didn't leave much to the imagination! 

My love of dressing gowns started in my early teens. You know that time of life where the weekends are made for sleeping-in and catching up with friends, and when you think it's entirely appropriate to still be walking around in your pjs at 3 o'clock in the afternoon. Well, I'm a bit cold-blooded and I grew up in a large and very cold old villa (think ice on the inside of the windows in winter, no joke!), so it wasn't enough for me just to wear my pjs around the house. I needed a dressing gown, and it wasn't long until I got one. Dark green candlewick it was too. It weighed a ton but wearing it felt just about as good as still being snuggled up under layers and layers of wool blankets in bed. Of course it looked awful. The colour did absolutely nothing for me, and I'm pretty sure that candlewick is generally only used for bedspreads for a reason. Add to that the fact that it was full length and you've got yourself one very unattractive piece of attire. Still, it came with me to university (that candlewick is very hard-wearing!) and when it did eventually get threadbare I replaced it with a slightly more modern version. This time a white, knee-length dessing gown that showed up all the stains from where I'd drop my breakfast on it. While not as good as the first, I was still loyally devoted to it and was with me for the better part of 4 years I'd say.

Eventually, however, that one wore out too and I'm now onto my third dressing gown, a full-length, light blue, completely 100% man-made creation that is very snuggly. A little too snuggly at times actually. Being altogether absent of any natural fibres its lack of breathability does mean it has the tendency to make me overheat and perspire very unglamorously now and then. I would like to say that that's its only flaw, but there is another - I look like the cookie monster in it. Still, it serves me well when I'm up in the night or doing all those jobs a mother does before she has her morning shower, so I love it regardless.

Now, having for so many years started my day off by getting out of bed and immediately putting on my dressing gown, I decided that Thomas needed to experience the joy of this too. No more running around in just pjs on these increasingly cold mornings for him! Luckily in the pile of Mum's old patterns I found one for a kids robe in just the right size, so I was all set. I bought some navy polar fleece and let Thomas choose some fun lion buttons and got to sewing. After struggling to understand the pattern's instructions (who writes these things?), realising my automatic button-holer couldn't handle the fabric, and running out of the right coloured cotton more than once I finally finished. The result was gorgeous - warm, snuggly and very cute. I couldn't wait for Thomas to try it out!

Unfortunately, it appears that Thomas does not share my love of dressing gowns. He won't wear it, or at least not for any length of time. Even the lion buttons aren't enough to make him look favourably on it. I'm not entirely sure what it is he dislikes about it - it could be the collar (I think it's a bit tickly about his chin), or the fact that he's the opposite to me and never seems to feel the cold so doesn't need it, or maybe he just takes after his granddad. Either way, I think it's been relegated to the back of the bedroom door for eternity. Oh well, I guess I'll just have to resign myself to the fact that dressing gowns just aren't for everyone, and especially not my little Mr T.

Thursday, March 11, 2010

Thank you


This post is a very special thank you to everyone who took the time to complete my recent survey. I had a marvellous response, received some great feedback, and hopefully this blog and my fabrication shop will improve as a result of it. And, congratulations to Sarah P who won the prize draw and now has some lovely new fabric!

I just wanted to comment on a few things that came up ...

Firstly, I support kiwi-made and use a NZ company to host my fabrication shop, called Smallfish. They offer a great service for a relatively low price, which means I didn't have to spend thousands (literally) getting myself online. But, because the website is run off a template format it does have it's limitations, like you can't save your order, and the pics on the front page don't act as links, and setting a variable postage rate becomes a bit tricky, hence the standard $5 postage charge (personally I think this is pretty reasonable - no matter how much you buy I wrap your fabric so it's like getting a present, I courier your precious package, and my prices are low to compensate for the need to pay for the postage [which is probably still less than you'd spend running about town in your car]). I feel your frustration on these things though, so thanks for telling me - it's very helpful feedback and I will certainly pass it on to the team at Smallfish. Like me, they are continually trying to improve their offering so I'm sure they'll be delighted to hear your thoughts.

But, there are a few things which you commented on which can be done ... for example, you can enlarge pictures of the fabrics simply by clicking on them. This will also allow you to see the other pictures of the same fabric so you can click through those as well.  And, if you want to see the picture and the info at the same time right from the start, simply click on the "more info" button just below the picture. Also, I now sell all orders of 1 unit (or 0.25m) as a fat quarter, unless specially requested otherwise. And, if you want a fat quarter bundle but can't handle the thought of it being completely my choice as to what you get, you can indicate your preference for the type of colours/patterns you want by giving me some instructions at the checkout. While you can't pick exactly what fabrics you'd like, this is kind of the point - it's a lucky dip and everyone knows they're great fun!

Finally, I know that buying fabric online is a bit tricky sometimes. I do my best to capture the colours as accurately as possible, but I know there's nothing like touching and feeling what you're about to buy. I love the idea someone had of being able to move the pics around so you could compare fabrics - unfortunately I don't think the team at smallfish can run to this modification, but remember that I am always more than happy to send you out samples if you need to see before you buy, or you can always email me with questions on what fabrics coordinate well together. In general I'd say the fabrics look better in real life than they do online, and there is nothing like receiving a parcel in the mail, so go on, be brave, and make the purchase. If you're really not happy with what you've bought then just let me know and I'll see what I can do, but I'm pretty sure you won't regret it! And, even after all that, if you're still not brave enough, the good news is that I'm back at Stash reHash in April and on the 21st of March I'll be at the St Patrick's school fair (check out this post for more details). And, since the response to having an open day was so overwhelmingly positive I'll be organising one of these too. Watch this space for details...

So, thanks again for taking the time to help me out. It's been great to hear from you all!
A x

Sunday, March 7, 2010

To market, to market part II

Exciting news all you Canterbury residents - Fabrication is going to be entering the real world for 2 upcoming markets, the St Patrick's school fair this month and Stash reHash next. Here are all the details of both:

St Patrick's School Fair
Sunday 21st of March
11:30am - 3:30pm
Cnr Idris and Jeffreys Road
Bryndwr
Christchurch
On wet or fine!

AND

Stash reHash
Sunday 18 April 2010
11am - 2pm
Scottish Society Hall
Cnr Edgeware and Caledonian Roads
St Albans
Christchurch


It would be lovely to see you, so please come along and support two great local events.

Saturday, March 6, 2010

Baby Dress


One of my good friends has just had her second baby, a wee girl! Since little baby girls are so cute (and since I don't have one of my own to dress) I decided I'd take this opportunity to make something gorgeous and small and girlie - what else but a beautiful dress?!

Having never made clothes for a small human of the female variety before I decided that a pattern was a definite must, so off I went in search of the perfect dress for a newborn. As all mothers know, any baby clothes must:
  1. Open at the front (never, ever, buy or make clothes for babies that open at the back! They're a complete nightmare to try and get on and off since bubs is all floppy and they can't sit them up while you dress them. Little babies lying face down while you struggle to get their clothes on is not ideal!)
  2. Must be long enough to cover them up and keep them snuggly. There's nothing worse than a baby getting passed around in gorgeous clothes only to spend the whole time pulling the outfit down to cover their nappy or keep them warm.
  3. Must be super cute. That way, at least those nosey people who you don't know from a bar of salt but just have to pop their head into the pram for a look can comment on the clothes, even if the baby doesn't meet with their approval.
Luckily I stumbled across New Look pattern 6903. It met all my criteria and worked perfectly with the fabrics types I had in mind. Being an autumn baby, I wanted to use a narrow soft cordouroy as the main fabric (mainly for warmth) and I wanted to use the Wa Nouveau Small Floral I have in stock as an accent. I found the perfect shade of cordouroy to match the floral, and then I just covered some buttons using the floral fabric. (If you've never covered your own buttons before you should really give it a go - it's a piece of cake and all you need is a wee kit which you can get at most fabric shops that sell accessories. I think a kit will set you back about $5, so it's as cheap as chips).  I used 1m of the cordouroy and a fat quarter for the rest, although I did deviate from the pattern when it came to the hem - I wasn't so into the frills, so went for a plain hem out of the coordinating floral rather than going with gathered cordouroy, and didn't bother with a pocket or an applique, as I thought the dress was gorgeous enough without it. Hopefully bubs and her mummy will agree!

Monday, March 1, 2010

Wedding bells

This summer we've been lucky enough to have been invited to five weddings, and of those we've been able to go to four. They were each quite different, but every one was absolutely lovely. So much romance, so much great food, so much fun choosing what to wear ...

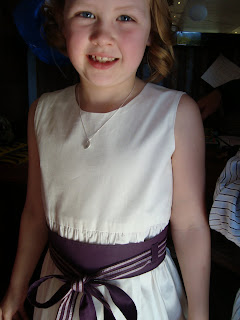
... Speaking of what to wear, I had the task of making flowergirl dresses for my three nieces for one wedding, and the sashes for the flowergirls' dresses at my friend's wedding.


The flowergirl dresses were lovely simple white dresses with a plain bodice and panelled skirts, made using the Simplicity pattern 5641, style B. Instead of having a sash at the front the dresses had a sash at the back instead, made of ribbon in blue  to match the bride's theme.


For the sashes, my friend wanted to incorporate both the tones of purple used in her bridesmaid dresses, but despite hunting all over town for the perfect ribbon we couldn't find anything. So, we did what all good DIY sewers do and made it up instead. For the main band of the sash I used a slightly stretchy dark purple (aubergine I suppose you could say) fabric and then I sewed three strips of light mauve ribbon on the darker fabric to make the ties. The effect was exactly what we were after and perfectly tied in the bridesmaid's colours. Unfortunately by late in the day when I took the photo above Olivia's sash had loosened off a bit and fallen down slightly, but you get the idea.

Tuesday, February 23, 2010

Win 1m of your favourite fabric from fabrication.co.nz!

I'm conducting a survey. Why? Because I'd love to know what you like (and don't) about the fabrication.co.nz website (and this blog too).

My survey is very quick - it's just 11 questions and will take no more than 3 minutes of your time. And, the best thing is, if you do help me out by letting me know what you think you'll go in the draw to win 1m of your favourite fabric from fabrication.co.nz. That's right, if you win the draw then you get to choose 1m of the fabric of your choice from me. In fact, I might even be so kind as to let you choose 0.5m each of 2 fabrics, or 0.25m each of 4 fabrics if you really can't make up your mind, but anyway, you get the gist. Answer the survey, go in the draw to win stuff.

And, it's all a piece of cake really. To complete the survey you just need to click on the link below:

http://www.zoomerang.com/Survey/?p=WEB22A95YJDSH6

It's all very self explantory, so you can't go wrong. There's just lots of ticking boxes, with the odd space to comment if you want to. Just please be honest. If you hate the site, tell me. If you love it, tell me. If you think I waffle (which I'm pretty sure I am right now), tell me. I don't care if you've never bought anything from fabrication.co.nz, or you're my best customer, I'd just love to hear from you either way, so please click on the link above and let me know what you think.

Thanks! A x

Monday, February 22, 2010

It's a good week ... more fabrics!


Lucky me ... another delivery today. Two more fabrics waiting on my doorstep when I got up this morning. This must be how my customers feel when their fabrics get dropped off by the courier. Today I got two fabrics from the Wildwood range by Erin McMorris: the floral is called Sophie's Garden and the beautiful coordinate is called Buttons. More delightful goodness from the team at Free Spirit, and just in time for the beautiful (and hot!) end of summer. 

Wednesday, February 17, 2010

Three times as nice


This week three new fabrics have arrived in at fabrication.co.nz, two from the delicious Wa Nouveau collection by Hokkoh of Japan, and one called Babushka by Kokka. All three are lovely - I'm eyeing up the Autumn Floral for a handbag design I've been working on, and think I'll use the Babushka fabric to make something for my friend who is expecting her baby girl to arrive any day. As for the Small Floral, well, something will come to me ...

As usual, all fabrics are available for purchase at fabrication.co.nz so now all you have to do is decide what you're going to make.

Friday, February 5, 2010

Purple


When I was about 7 my favourite colour in all the world was purple. I was particularly fond of that middle of the range soft type of purple, and distinctly remember having a nice purple outift - a purple sweatshirt (my favourite), and matching purple socks and headband. All sounds a bit cringe-worthy now, but hey, I was only 7. And, goodness knows I've made far worse fashion faux pas than that in my time!


After quite a few years where purple didn't really feature in my life I've noticed I'm trending back towards it. I'm not sure how much of that is just because it is becoming a bit more of an "in" colour, but regardless I'm happy about it.  The pictures above are a random selection of purple things from around my house (actually, mostly from the garden, which shows that nature loves it too!) - I hope you'll enjoy looking at them as much as I do.